


Project Hove

Not all jobs are plain sailing, and there are bad tradesmen out there who carry out jobs insufficiently, leaving an 80-year-old lady requiring more work than she had expected and lost trust in them to rectify, and so we took it upon ourselves to sort the issue for her.
The brands we trusted to complete the job.


Step 1 - Investigating
When we attened to measure and discuss patterns with the lady, as she was insistant on having a beautiful motif in her floor, we flagged the newly laid screed was still wet and was incredible dusty. Further research from the builder found they had laid the sand and cement, but left it open to the elements and it rained quite hard which injected more water into the sand and cement ratio then what was needed.
Our solution, despite knowing what to do, was to arrange a free site survey from F Ball and Co Ltd subfloor experts to carry out a investigation on exactly what to do and how to protect the new LVT floor.

Step 2 - Quoting
Once the report was sent to us we immediately quoted for the works needed to be carried out as with all our quotes. We itemised everything needing to be brought and the service needed to install each item, so that it was crystal clear for our customer and fully transparent.
Step 3 - Carrying out the work
The quote was accepted and with some of the work only taking either 2 hours or half a day, we managed to work another job into the diary at the same time, we meant we could lower the price for our customer a bit more, happy customer! Keeping to the report sent to us by F Balls and Co ltd the floor was installed and solid, a good base for our Amtico LVT tiles and Motif to bond too.


We like to document installs to show people how we do things to help people understand.

On day 1..
As shown in the video, we ground the floor of all the not nice bits, to a more solid and sound substrate so that our products will bond too. We also (not shown in the video) used an exterior repair mortar from F Ball to fill in the void between the new concrete to the kitchen wall, as the builder had left a large gap. Unlike other contractors or big retailers, we use a cyclone separator when carrying out these works to ensure a minimal dusty environment, which is then attached to my vacuum.
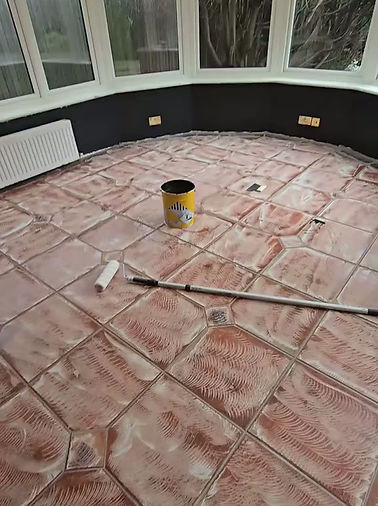
On day 2..
As shown in the video, we installed F Ball and Co Ltd, F77 DPM to the entire floor including the tiles as requested by the report made by F Ball and Co Ltd to ensure a perfect belt and braces subfloor.

On day 3..
As shown in the video, we installed a 5mm coat of F Ball and Co Ltd Stopgap 1200 smoothing compound over the entire floor, ready for the Amtico Signature LVT Tile effect and Motif floorcoverings to be installed to.

On day 4 and 5..
This is how unique and shows how adaptable we are, the orginally plan was to lay the tiles in uniform straight pattern, but after planning our layout, where each cut was going to go etc... after talking with our client, we both agreed the pattern needed to go uniform but as a diamond effect, the reason is because the kitchen was laid uniform straight, copying the line into the conservatory meant it did not look straight, so by going completely different it allowed us to find a new line and look perfect.
The motif was carefully worked out where in the room with the customer and it was set perfect with the tiles around the motif mirroring the opposite side.

On day 6..
We have finished the floor and given it a good clean ready for the customer to finally make the space feel like home.